Facebook

23 Oct 2013

Federal Forces from Gordon & Hague


Federal Forces

Federal Grand Army Box Set Price: $275.00

Federal Starter Army Box Set Price: $155.00

Federal Artillery Team Pack  Price: $2.19

Federal Artillery Team Pack

Federal Cavalry Pack Price: $2.19


Federal Infantry Command Pack Price: $2.19

Federal Infantry Pack Price: $2.19

Federal Militia Pack Price: $2.19

Federal Generals Pack Price: $2.19

Federal Scouts Pack Price: $2.19

Severed Union 1861-1865 The Rules

Players Pack Price: $28.00

Gordon & Hague

22 Oct 2013

Building Your Own Custom Battle Boards

Building Your Own Custom BattleBoard

STEP 1
Using a sharpie marker, roughly draw where you want things to go such as roads, plowed fields, towns etc. Having a good plan will make it much easier to construct the field and make it look proportioned.

For this battleboard, I put in a road going across that forks off in two different directions. I also wanted to try my hand at adding some old plowed fields that had been unkept for a good while.

STEP 2
Apply Spackling Paste to the road surfaces and plowed field lines with a putty knife. This will give the surface a slightly raised and well-travelled muddy look. Finished should look like this.

Allow the spackling paste to dry for 24 hours then go over it lightly with sandpaper. Be sure to do this gently because you don't want to remove too much of the paste and not allow it to stand out on the board.

STEP 3
Once the spackling is dry and sanded down, apply Elmers wood glue to the entire board excluding the spackled surfaces. Be generous with your coat because you want to ensure the ground ballast that's applied in the next step hardens firmly to the board.

STEP 4
Sprinkle the Woodland Scenics Fine Ballast over the board so that all areas have a good covering. Allow to dry for 24 hours, this will ensure that the ballast is secure to the board before painting. Once dry it's always a good idea to tilt the board so that any excess ballast falls off.

STEP 5
Its now time to paint the board! Spray paint is recommended because painting the board may cause some of the ballast to come loose. You can spray paint the board brown or for a darker battlefield look, you can spray paint or paint the entire board black first then spray paint or paint it brown.

STEP 6
Now it's time to drybrush the board. Drybrushing is a shading technique where you paint over colours with lighter shades of the same colour to bring out more detail and give it a more realistic view. Mix some flat brown paint with lighter browns or add white paint to get a lighter shade. Put some on a brush and remove most of it with a towel, then gently brush over the board so that just a little bit of the paint sits on the board. You'll begin to see the difference immediately.

STEP 7
Once the paint has dried, it's time to apply some of the Woodland Scenics Fine Turf to show fields and patches of grass. Simply apply more Elmers glue to random areas of your own choosing and then sprinkle fine turf on those areas.

STEP 8
For the last step you can add trees and bushes if you'd like. I usually place my trees on the board permanently, so I drill a hole and insert the tree with some glue.

Another small step that I do is spray some green spray paint over areas of the grass. This gives a little shading to the grass patches.


Now you're all set and ready to go!
Happy Gaming.

Gordon & Hague

21 Oct 2013

Attaching Flags to Infantry Command Units


STEP 1
Cut out one flag from a flag sheet.

STEP 2
Fold the flag over and make sure the edges line up properly

STEP 3
Apply a small amount of glue to the inside of the folded flag, and then slide the flag down the flagpole. Once you are happy with the placement of the flag on the pole, go ahead and pinch down on the flag to seal it around the pole.

STEP 4
After an hour of drying the glue will be set and the flag will have a harder texture. Bend the flag ends to give the illusion of wind. You can also hold a lighter near the flag to give it a worn and tattered look.

And that's it!
Equipping your army with flags is an easy and quick way to enhance your gaming experience and make your models shine on the tabletop. It also allows you to get creative and build unique units and help differentiate between all the different elements of your army.

A Federal division with flags held high, desperately cling to control of the high ground.

Gordon & Hague

20 Oct 2013

Enhancing Your Entire Army In Three Fast Steps

Enhancing Your Entire Army In Three Fast Steps

STEP 1
Adding Some Color Variations Amongst The Ranks
This is especially important with your Confederate models because they had a wide variety of fabrics, uniforms and styles. Take some earth tone colors and paint some of the details of the models such as, hats, blanket rolls, trousers, jackets, and leathers. Don't worry about being perfect with your painting, the dipping step will help to blend in any imperfections. You don't need to add many colors to federal models because they typically were very uniform in appearance, unless you wanted to do a western theatre federal unit or a zouave unit.

STEP 2
Dipping the Miniatures
Using Army Painter Quick shade dip, brush over the miniatures with a solid coat. You will begin to see the results almost instantly. The dip darkens the miniatures, adding shading and it also blends all the colors together perfectly. The dip also helps to give the models a dirty ragged campaigner look. Allow the dipped models to dry for 24 hours before moving on to step 3.

STEP 3
Basing Your Models
Enhancing the look of your model's bases can greatly improve the look of your army. There are many types of static grasses and flocks available on the market to use. Typically we use a standard green field grass.

To apply the static grass to the bases, simply use a small brush and paint on some white glue in 2 or 3 areas on the base.
Then using your hands simply apply some static grass to the glue covered areas and gently press down on the grass with your finger. Allow to dry for a few hours and that's it!
You can also paint on some lighter browns to give the illusion of muddy areas and boot tracks.

Gordon & Hague

15 Oct 2013

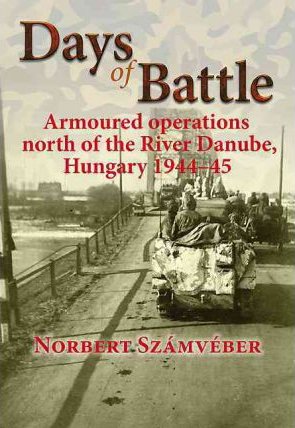
Days of Battle: Armoured operations north of the River Danube, Hungary 1944 45

Days of Battle: Armoured operations north of the River Danube, Hungary 1944 45

A very important new study that throws much-needed light on armoured warfare on the Eastern Front during the final months of the war Days of Battle describes a hitherto neglected part of the military history of Hungary during World War II.

In three separate studies, Dr Norbert Számvéber, drawing from files and documentation from German, Hungarian and Soviet sources, presents detailed accounts of four important clashes of German-Hungarian and Soviet armour north of the river Danube, in the southern territory of the historical Upper Hungary (part of Hungary between 1938 and 1945, at the present time now part of Slovakia).

The first is an account of the battle between the Ipoly and Garam rivers during the second half of December 1944, in which the élite Hungarian Division Szent László saw action for the first time.

The second study is about the fierce tank battle of Komárom, fought between the 6 22 January 1945. This was an integral part of the Battle for Budapest, parallel in time with Operation Konrad.

The third part of the book describes the combat during the German Operation Südwind in February 1945 and the Soviet attack launched in the direction of Bratislava in March 1945.

7 Aug 2013

10mm Caesarian Romans from Adler Miniature

10mm Caesarian Romans from Adler Miniature

Having been asked to produce Ancients in 1/300th a fair bit over the years we have finally decided to do an Ancient range but to go up to 10mm. Myriad reasons for this but mainly its the extra size means we can depict the armour and dress of the period with greater detail and variations.

It also has the benefit of making the weapons more robust and also allows for the casting of figures with 'open hands' to allow for the fitting of separate more robust spears..

The first instalment are Gauls and Ceasarian Romans

Caesarian Romans

CR 1 Legionary advancing with sword ( 20)
CR 2 Legionary advancing with pila
CR 3 Legionary throwing pila
CR 4 Legionary standards(4), musicians(8), Optios (4), Centurions (4)
CR 5 Mounted and dismounted Legate and tribune, musicians (2)Aquifer (1)
CRC 1 Bodyguard cavalry (4) ( Not yet available)
CRC 2 Legionary cavalry ( 15) ( Not yet available)

TRANR 1 Legionary shield transfers ( 21 scutum and 4 round patterns ( Four patterns available)

Adler Miniatures

6 Jun 2013

Operation Barbarossa: The Complete Organisational and Statistical Analysis, and Military Simulation, Vol. 1

Operation Barbarossa: The Complete Organisational and Statistical Analysis, and Military Simulation, Vol. 1

In June 1941 the Wehrmacht launched Operation Barbarossa: the attack on the Ussr and the largest land invasion in recorded history.

Operation Barbarossa: the Complete Organisational and Statistical Analysis, and Military Simulation focuses on 1941 when the Ussr came closest to defeat. It includes full analyses of the belligerents' armed forces, weapons, equipment, personnel, transport, logistics, war production, mobilisation and replacements.

The work employs a unique military simulation methodology, extending from the tactical to the strategic level, and applies this methodology to each of the belligerents.

Volume I, the first of six volumes, is primarily concerned with the structure of this methodology, but uses many of the events and weapons from Operation Barbarossa as illustrative case studies. The complete work represents the most historically accurate, advanced and comprehensive analysis of the first six months of the largest and most decisive military campaign of WWII.